2015年2月2日 星期一

[Android] ViewPager的簡易使用方法,Fragment,以及切換分頁監聽實作

之前看一些可以分頁的APP又有動畫,都只是把程式碼抓下來修改一下,就用了.

今天終於稍微搞懂一些裡面的用法.

首先MainActivity.java

1.第一目標 ------ extends FragmentActivity

然後裡面宣告一個PagerAdapter 的變數

2.PagerAdapter宣告的時候一定是出現錯誤,因為你還沒建立一個名為PagerAdapter的型態的

class 所以我們就多建一個java檔名為PagerAdapter 記得要implement FragmentPagerAdapter!

import java.util.List;

import android.support.v4.app.Fragment;
import android.support.v4.app.FragmentManager;
import android.support.v4.app.FragmentPagerAdapter;

public class PagerAdapter extends FragmentPagerAdapter {


private List<Fragment> fragments;

public PagerAdapter(FragmentManager fm, List<Fragment> fragments) {
super(fm);
// TODO Auto-generated constructor stub
this.fragments = fragments;
}

@Override
public Fragment getItem(int arg0) {
// TODO Auto-generated method stub
return this.fragments.get(arg0);
}

@Override
public int getCount() {
// TODO Auto-generated method stub
return this.fragments.size();
}

}

裡面就是實作他需要的方法(可以按add unimplement method來建立)

3.把PagerAdapter建立起來以後就是要加入分頁了!

在onCreate()裡面新增:

(初始化pager)
private void initialisePaging() {
// TODO Auto-generated method stub
List<Fragment> fragments = new Vector<Fragment>();
fragments.add(Fragment.instantiate(this, Fragment1.class.getName()));
fragments.add(Fragment.instantiate(this, Fragment2.class.getName()));
mPagerAdapter = new PagerAdapter(this.getSupportFragmentManager(),
fragments);

ViewPager pager = (ViewPager) findViewById(R.id.viewpager);
pager.setAdapter(mPagerAdapter);

myPageChange = new myPageChangeListenter();//new
pager.setOnPageChangeListener(myPageChange);//建立監聽
}

這邊就是建立一個list 然後放進去兩個class(也就是未來的兩個分頁)

當然要在外面宣告兩個變數

private PagerAdapter mPagerAdapter;
public myPageChangeListenter myPageChange;//先宣告一個該型態的變數

不然他會抓不到

--------------------------------------------分隔線------------------------------------------------------

如果到這邊都OK的話,你已經完成一半了.

接下來還要設定監聽(滑動的時候要監聽,不然系統不會去抓你滑到哪一頁了)

我們在上面有用pager.setOnPageChangeListener(myPageChange);來建立監聽

下面當然是要實做這個 myPageChangeListener

public class myPageChangeListenter implements OnPageChangeListener{

@Override
public void onPageScrollStateChanged(int arg0) {
// TODO Auto-generated method stub
//Log.d("change to page = ",Integer.toString(arg0));
}

@Override
public void onPageScrolled(int arg0, float arg1, int arg2) {
// TODO Auto-generated method stub
//Log.d("scroll to page = ","here");
}

@Override
public void onPageSelected(int arg0) {
// TODO Auto-generated method stub
Log.d("select to page = ",Integer.toString(arg0));
//第一頁為0,第二頁為1
}
}

}

非常簡單,我個人習慣使用onPageSelected來設定動作,都可以透過Log來測試你想要的觸發

--------------------------------------------分隔線------------------------------------------------------

有了 監聽 /  PagerAdapter  還需要分頁.....

這部分最大的問題就是在於抓不到該分頁的元件id,當然後來解決了(不然也不會發文)

package com.example.viewpagerexample;

import android.content.Context;
import android.os.Bundle;
import android.os.Handler;
import android.os.Message;
import android.support.v4.app.Fragment;
import android.util.Log;
import android.view.LayoutInflater;
import android.view.View;
import android.view.ViewGroup;
import android.widget.ImageView;
import android.widget.LinearLayout;
import android.widget.TextView;

import com.civetcat.weather.library.WeatherInfo;
import com.civetcat.weather.library.YahooWeather;
import com.civetcat.weather.library.YahooWeather.SEARCH_MODE;
import com.civetcat.weather.library.YahooWeatherInfoListener;

public class Fragment1 extends Fragment implements YahooWeatherInfoListener{

    public View view;

@Override
public View onCreateView(LayoutInflater inflater, ViewGroup container,
Bundle savedInstanceState) {
// TODO Auto-generated method stub
if (container == null) {
return null;
}

view = inflater.inflate(R.layout.fragement1_layout,container, false);

               //中間可以使用
               TextView txv = (TextView) view.findViewById(R.id.xxx);
               //來抓取id

return view;
}
}

Fragment2 也是類似的就不多貼了!

至於layout的部分:

(viewpager_layout.xml)

<?xml version="1.0" encoding="utf-8"?>
<LinearLayout xmlns:android="http://schemas.android.com/apk/res/android"
    android:layout_width="fill_parent"
    android:layout_height="fill_parent"
    android:orientation="vertical" >
   
    <android.support.v4.view.ViewPager
        android:id="@+id/viewpager"
        android:layout_width="fill_parent"
        android:layout_height="fill_parent"
        />
</LinearLayout>

這部分是重點!!

看我們這邊在MainActivity.java裡面設定的

setContentView(R.layout.viewpager_layout);

因此該xml檔必須要有ViewPager 不然怎麼去抓呢? 

大致上就是這樣,把寫了一個天氣的範例放上來,可以參考看看


END


2015年1月27日 星期二

[iOS] 警告訊息框 + 帳號密碼輸入

練習到這部分又覺得這個功能很實用,於是又放上來了 。

其實跟昨天的那篇沒有差太多,但就是進階版本。(詳情可以看 警號訊息框 )

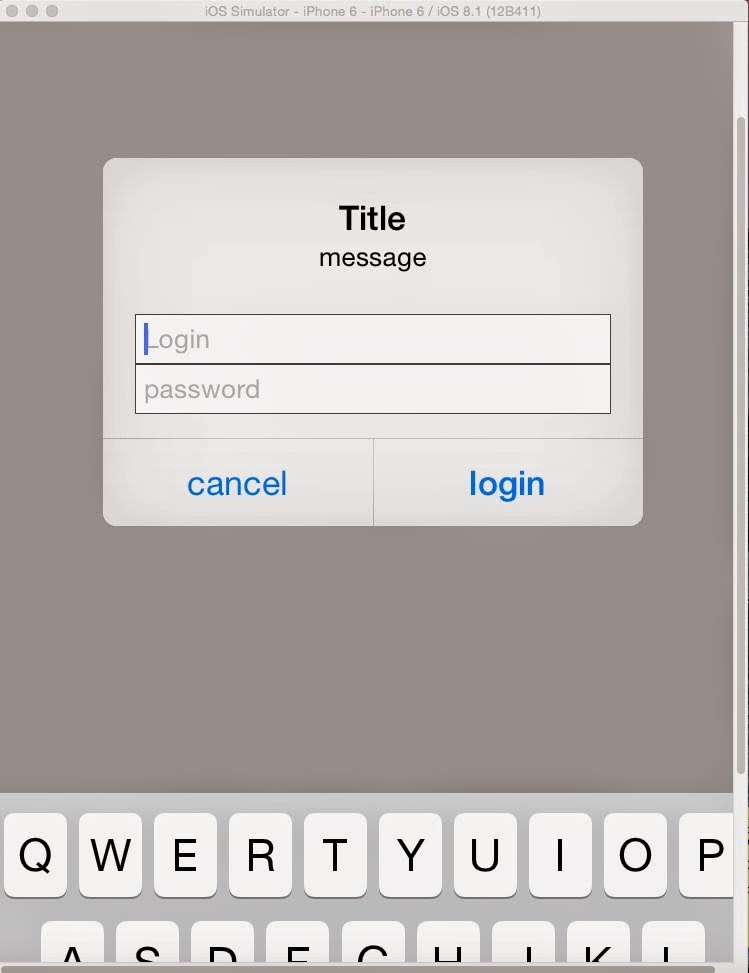
先放上完成圖 & code


一樣是在viewcontroller.m裡面做修改喔!

詳細的備註程式裡面有寫完整了,如果還不會也是可以發問

//
//  ViewController.m
//  AlertDialog_with_account_n_passwd
//
//  Created by daniel on 2015/1/27.
//  Copyright (c) 2015 daniel. All rights reserved.
//

#import "ViewController.h"

@interface ViewController ()

@end

@implementation ViewController

- (void)viewDidLoad {
    [super viewDidLoad];
    // Do any additional setup after loading the view, typically from a nib.
}

- (void)didReceiveMemoryWarning {
    [super didReceiveMemoryWarning];
    // Dispose of any resources that can be recreated.
}

- (void) viewDidAppear:(BOOL)animated
{
    //create a UIAlertController
    UIAlertController *alertController = [UIAlertController
                                          alertControllerWithTitle:@"Title" message:@"message" preferredStyle:UIAlertControllerStyleAlert];
    //declare a "cancel" button
    UIAlertAction *cacelAction = [UIAlertAction actionWithTitle:@"cancel" style:UIAlertActionStyleDefault handler: ^(UIAlertAction *action){
        [self dismissViewControllerAnimated:YES completion:nil];}];
    //declare a "login" button
    UIAlertAction *okAction = [UIAlertAction actionWithTitle:@"login" style:UIAlertActionStyleDefault
        handler:^(UIAlertAction *action){
            NSString *uid = ((UITextField *) [alertController.textFields objectAtIndex:0]).text;
            NSString *pwd = ((UITextField *) [alertController.textFields objectAtIndex:1]).text;
            NSLog(@"account = %@",uid);
            NSLog(@"password = %@",pwd);}];
    //create first textfield
    [alertController addTextFieldWithConfigurationHandler:^(UITextField *textField)
    {textField.placeholder = @"Login";}];
    //create second textfield
    [alertController addTextFieldWithConfigurationHandler:^(UITextField *textField)
    {textField.placeholder = @"password";
        textField.secureTextEntry = YES;}];
    
    [alertController addAction:cacelAction];
    [alertController addAction:okAction];
    
    [self presentViewController:alertController animated:YES completion:nil];
                                  
}

@end


就是這樣囉!

END

[Mac] Yahoo輸入法 &載點

先說明一下Yahoo輸入法是完全免費的,但已經沒有在更新了,目前只剩下放在github提供大

家下載這樣而已。


下載完成之後記得要修改權限,不然是不能安裝的


安裝完以後要到鍵盤(可以用spotlight找一下鍵盤在哪邊)

按左下角的+ 然後選擇繁體中文 ->找到yahoo奇摩輸入法->確定

就可以囉!

Yahoo輸入法 Mega 載點

2015年1月26日 星期一

[iOS] 跳出警告 / 提醒訊息框

看到這個滿重要又實用的功能 ,決定寫起來記錄一下

在ViewController.m裡面增加 -(void)viewDidAppear:(BOOL) animated{}

簡單講就是宣告一個UIAlertController 然後建立風格、輸入訊息 以及增加按鈕

//
//  ViewController.m
//  Alert Dialog
//
//  Created by daniel on 2015/1/26.
//  Copyright (c) 2015 daniel. All rights reserved.
//

#import "ViewController.h"

@interface ViewController ()

@end

@implementation ViewController

- (void)viewDidLoad {
    [super viewDidLoad];
    // Do any additional setup after loading the view, typically from a nib.
}

- (void)didReceiveMemoryWarning {
    [super didReceiveMemoryWarning];
    // Dispose of any resources that can be recreated.
}

- (void) viewDidAppear:(BOOL)animated
{
    //產生一個UIAlertController 風格為 UIAlertcontrollerSyleAlert
    //風格可以換成UIAlertControllerSyleActionSheet
    UIAlertController *alertController = [UIAlertController
                                          alertControllerWithTitle:@"標題" message:@"訊息" preferredStyle:UIAlertControllerStyleAlert];
    
    //宣告一個確定按鈕
    UIAlertAction *okAction = [UIAlertAction actionWithTitle:@"確定" style:UIAlertActionStyleDefault
    handler:^(UIAlertAction *action){
        //按下按鈕要做的事情寫在這
        [self dismissViewControllerAnimated:YES completion:nil];
    }];
    //將確定按鈕加入到UIAlertController
    [alertController addAction:okAction];
    //顯示這個Controller 也就是訊息框
    [self presentViewController:alertController animated:YES completion:nil];
}


@end


Action 那邊是類似onClick()的時候要做什麼這樣
Style可以選擇兩種


相信大家應該看程式碼就大概瞭解了吧?

就不多解釋了,不過在Objective-C裡面 nil = null這點可能要了解就可以了

END

2015年1月23日 星期五

[iOS] Apple XCode 6 初體驗

先把設備說一下:

Apple Mac Mini 2.4G這一款 1TB 8G RAM

系統是  : Yosemite 10.10

編譯程式: XCode 6


首先還是先創立一個Hello World 來熟悉一下介面


Main.storyboard 負責介面,介面上有任何問題就是看這個檔案


   接下來就是像android 一樣 你在xml檔上面建立的東西 要讓程式知道,所以按著control

   鍵拖曳到程式碼那邊就可以完成宣告了


   顯示出來就是長這樣


負責動作的部份是在  ViewController.m ( like onCreate, onPause)

負責宣告的部分則是在ViewController.h ( 介面--程式碼連結)


**這邊紀錄一下一開始在測試的時候模擬器都是黑屏,搞得很煩

最後解決方式是重新建立一個Project,不然一直有thread1:signal sigabrt 錯誤


大概就是這樣, Apple的開發跟Google差很多 習慣中End